Launch and halt Gremlin Chaos Engineering attacks and load testing from JMeter

JMeter is a powerful and flexible load and performance testing tool that can simulate traffic of users clicking through your website or trying your API. But load testing is limited, especially when used in a test or staging environment. Since you're only simulating traffic inside a controlled environment, you’ll have no idea how your site or APIs will handle real world failure modes like a runaway process or latency from a bad network connection. That’s where Chaos Engineering and Gremlin are useful. Using load testing and Chaos Engineering together can simulate traffic load under whatever condition you can imagine so that you feel confident that your application is prepared for anything.
This tutorial will walk through how to add a chaos experiment to your JMeter load test. You can copy this XML and update the<span class="code-class-custom"> teamid, api_key</span>, and <span class="code-class-custom">test_URL</span> to match your settings.
Prerequisites
Step 1: Gather your Gremlin Team ID and an API Key
First, grab your Gremlin Team ID by going to Team Settings -> Configuration. Copy that ID for use in the next stage.

Create an API key in Gremlin to authorize JMeter to run attacks. In Gremlin, go to Team Settings -> API Key -> New API Key.

Save that key for use in the next stage.
Step 2: Set global variables
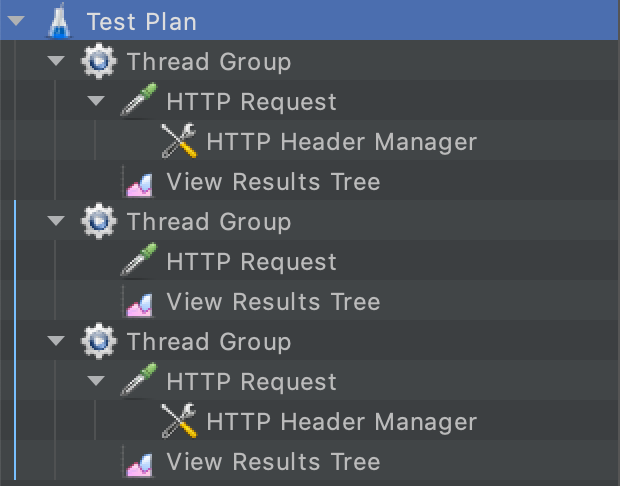
In JMeter, start a new Test Plan. Set to “Run thread groups consecutively”. This will have each Thread Group run one at a time as opposed to in parallel. Under “User Defined Variables” set your<span class="code-class-custom"> teamid </span>and <span class="code-class-custom">api_key</span> from Gremlin. This will make it easier to make multiple Gremlin API calls.

Step 3: Gremlin API call Thread Group
In this stage, you’ll add an API call to start an attack using JMeter. Add a thread group by going to Add -> Threads -> Thread Group.
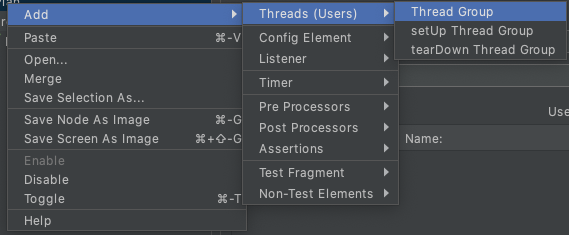
Next, add an HTTP call by going to Add Sampler -> HTTP Request.

Then, set the HTTP Request to <span class="code-class-custom">POST</span> and the Path to <span class="code-class-custom">https://api.gremlin.com/v1/attacks/new?teamId=${teamid}</span>. Enter the API call for an attack. This is for a latency attack lasting <span class="code-class-custom">300 seconds</span> with <span class="code-class-custom">100 MS </span>of latency:
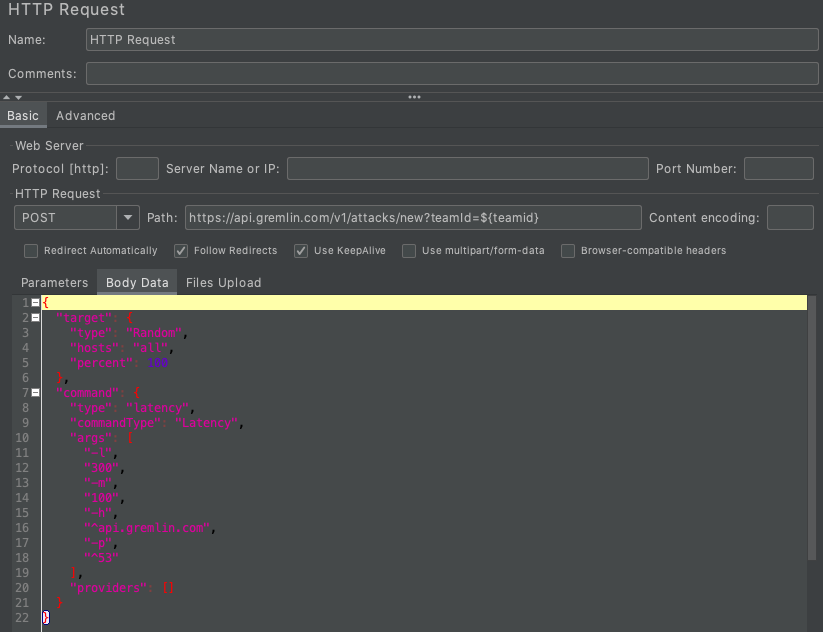
Next, add the HTTP header information for your API call. Go to Add -> Config Element -> HTTP Header Manager.
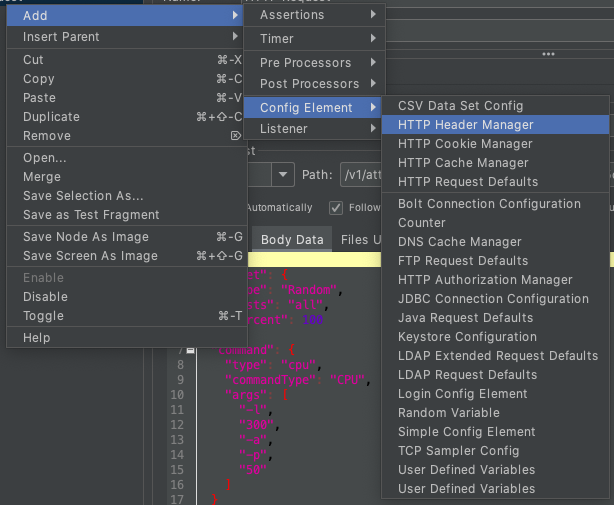
Add 2 headers: <span class="code-class-custom">Content-Type:application/json</span> and <span class="code-class-custom">Authorization:Key ${api_key}</span>.

Then, add a results listener to make sure requests go through. Go to Add -> Listener -> View Results Tree.
Step 4: Generate website traffic
For this stage, you will generate some website traffic to see how your system works with the added latency. JMeter allows for replicating complex traffic patterns, but we’ll stick to a simple frontend call for this tutorial.
Add a new Thread Group. Set Loop Count to <span class="code-class-custom">1000</span> and set “Action to be taken after Sampler” error to “Stop Thread”. This will make it so that if a thread fails to get to the website, it will move to the next Thread Group (Halt attacks). Add an HTTP Request to your Thread Group and set HTTP Request to <span class="code-class-custom">GET</span> and the Path to <span class="code-class-custom">${test_URL}</span> that you set in Step 2 (I’m using <span class="code-class-custom">gremlin.rocks</span>).

Add in a Results Tree under the HTTP Request to watch for failed requests.
Step 5: Add a halt experiments call after the test
As a safety mechanism, we’ll halt all attacks when the testing is over. This will also be triggered if the requests in the previous step failed.
Add a Thread Group. Set HTTP Request to DELETE and<span class="code-class-custom"> Path https://api.gremlin.com/v1/attacks/</span>.
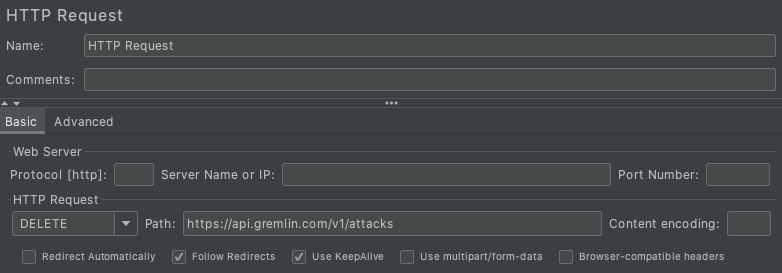
Copy the HTTP Header Manager from Step 3 to the HTTP Request. This will use the same API key from that stage. Finally, add a Results Tree to check that the API call went through.
Step 6: Start the test plan and observe
Click Start to run through the Test Plan. Note if any of the requests fail. You can see in Gremlin’s UI when the attack starts and halts.


Once you’ve tried this experiment and traffic combination, try a different attack or expand the blast radius and add in more complex traffic patterns with multiple steps. Using load testing in combination with Chaos Engineering gives you a better understanding of how your system will handle traffic load in any condition so you can feel confident to release reliable products into production.
Avoid downtime. Use Gremlin to turn failure into resilience.
Gremlin empowers you to proactively root out failure before it causes downtime. See how you can harness chaos to build resilient systems by requesting a demo of Gremlin.
.svg)

.svg)
.svg)
