How to run a GameDay using Gremlin

Introduction
In this tutorial, we'll show you how to run a GameDay using Gremlin's GameDay feature. We'll walk through creating a GameDay in the Gremlin web application, adding a Scenario, adding teammates to the GameDay, then finally executing the GameDay.
By reading this tutorial, you'll learn how to organize and run your own GameDays within the Gremlin web app.
Overview
This tutorial will show you how to:
- Step 1 - Prepare for the GameDay
- Step 2 - Create the GameDay in Gremlin
- Step 3 - Run the GameDay
- Step 4 - Record your conclusions and action items
Background
The term "GameDay" was coined by Jesse Robbins when he worked at Amazon as "Master of Disaster." He was responsible for the availability of all Amazon branded web properties, and he created GameDays with the goal of increasing reliability by purposefully causing major failures on a regular basis.
So, what exactly is a GameDay? A GameDay is a period of time (usually 2—4 hours) set aside for a team to run one or more chaos experiments on a system or service, observe the impact, then discuss the technical outcomes. A typical GameDay involves a team of engineers who develop and/or support an application, with each team member assigned one of four roles: Owner, Coordinator, Reporter, or Observer.
- Owners own the overall GameDay. They decide on the plan, schedule, and whether to halt the experiment.
- Coordinators prepare the GameDay, coordinate other participating roles, and initiate the attacks in the Gremlin application.
- Reporters record notes, key observations, and results from the GameDay and enter them in the Gremlin application.
- Observers gather data from Gremlin and any monitoring tools during the GameDay. They inform other participants on key observations and also verify the results.
GameDays should only have one Owner, Coordinator, and Reporter, but multiple people can play the role of Observer. GameDays can also involve non-technical stakeholders, such as team leads and product managers.
Prerequisites
Before starting this tutorial, you’ll need the following:
- A Gremlin account (sign in or request a demo).
- An active target running the Gremlin agent (such as a Linux or Windows system).
- At least one saved Scenario. Learn how to create Scenarios here.
Step 1 - Prepare for the GameDay
Because GameDays involve several members of the team and can take multiple hours to execute, it's important to design your GameDay before you actually run it. When preparing, answer the following questions:
- Which application(s) or service(s) will you be testing?
- Who should be involved in this GameDay? At the very least, engineers who own and/or maintain the service should be involved because they know how it works better than anyone else.
- Who is likely to be affected by you running an experiment on this service? Anyone depending on the service for their work should be notified in advance to avoid being significantly impacted by any experiments.
- What is the goal of the GameDay? In other words, what is it you're trying to determine or verify? This can include testing automatic failover, verifying an alert, training the team on responding to an incident, etc.
- What time will everyone be available to get together for the GameDay?
These questions will determine who all should be involved in the GameDay, which systems will be targeted, which Scenarios the team will run, what outcomes the Observer(s) should be watching for, and what the team should discuss when the Scenarios have finished running and the team has had a chance to review the metrics.
Step 2 - Create the GameDay in Gremlin
In this step, you’ll construct the GameDay in the Gremlin web app so you and your team can execute experiments, observe and link metrics, and record outcomes. Once you've created a GameDay in Gremlin, you can run it as many times as you like. Gremlin saves the information about each run including the date, the results, and any notes added by the Recorder.
To create a new GameDay, log into the Gremlin web app and click on the GameDays icon in the left-hand navigation bar (or go directly to app.gremlin.com/gamedays). Click on New GameDay, then do the following:
- Enter a Name for the GameDay. Consider entering a descriptive name that explains what the GameDay is testing for.
- Select the Type of GameDay. This describes the intent of the GameDay, such as recreating a past outage, testing and fine-tuning observability systems, or training the team on incident response. If none of the options applies to your GameDay, select Other.
- Enter your Goal for the GameDay. This is the desired outcome, or what you expect you and your team to get out of the GameDay. For example, the goal of a GameDay designed to test an observability tool by consuming CPU might be to "ensure an alert fires when CPU usage exceeds X%". This field may populate automatically depending on the Type of GameDay selected.
- Add one or more Scenario(s) to this GameDay. This list includes all Scenarios created and shared by your Gremlin team. Note that these Scenarios must already have targets selected.
- Enter the name of the Environment that the GameDay is running in (Production, Staging, Development, etc.)
- Optionally, enter the URLs for any Dashboards or Runbooks that you want to link to this GameDay. Use the Dashboards field to link to observability tools to quickly access metrics, traces, or logs relevant to the GameDay. Use the Runbooks field to link to incident response tools and processes for the systems or services targeted by this GameDay, so that your team can quickly reference them in case of any unexpected issues.
- Add the GameDay Participants. These are all of the team members who will be involved in the GameDay.
- Select the Position that the team member will fulfill. This can be Owner, Coordinator, Observer, or Reporter. You can find descriptions of each role in the Gremlin glossary.
- Select a Participant from the drop-down list. This list contains all members of your Gremlin team. If you don't have a team member to assign to a role, select Unassigned.
- Add additional participants by clicking the + button next to the bottom-most entry. You can also remove an entry by clicking the - button next to the entry that you want to remove. Note that newly added participants will default to the Observer role. In addition, only one participant can be assigned to each of the Coordinator, Reporter, or Owner roles.
- Click Save GameDay to save the GameDay.
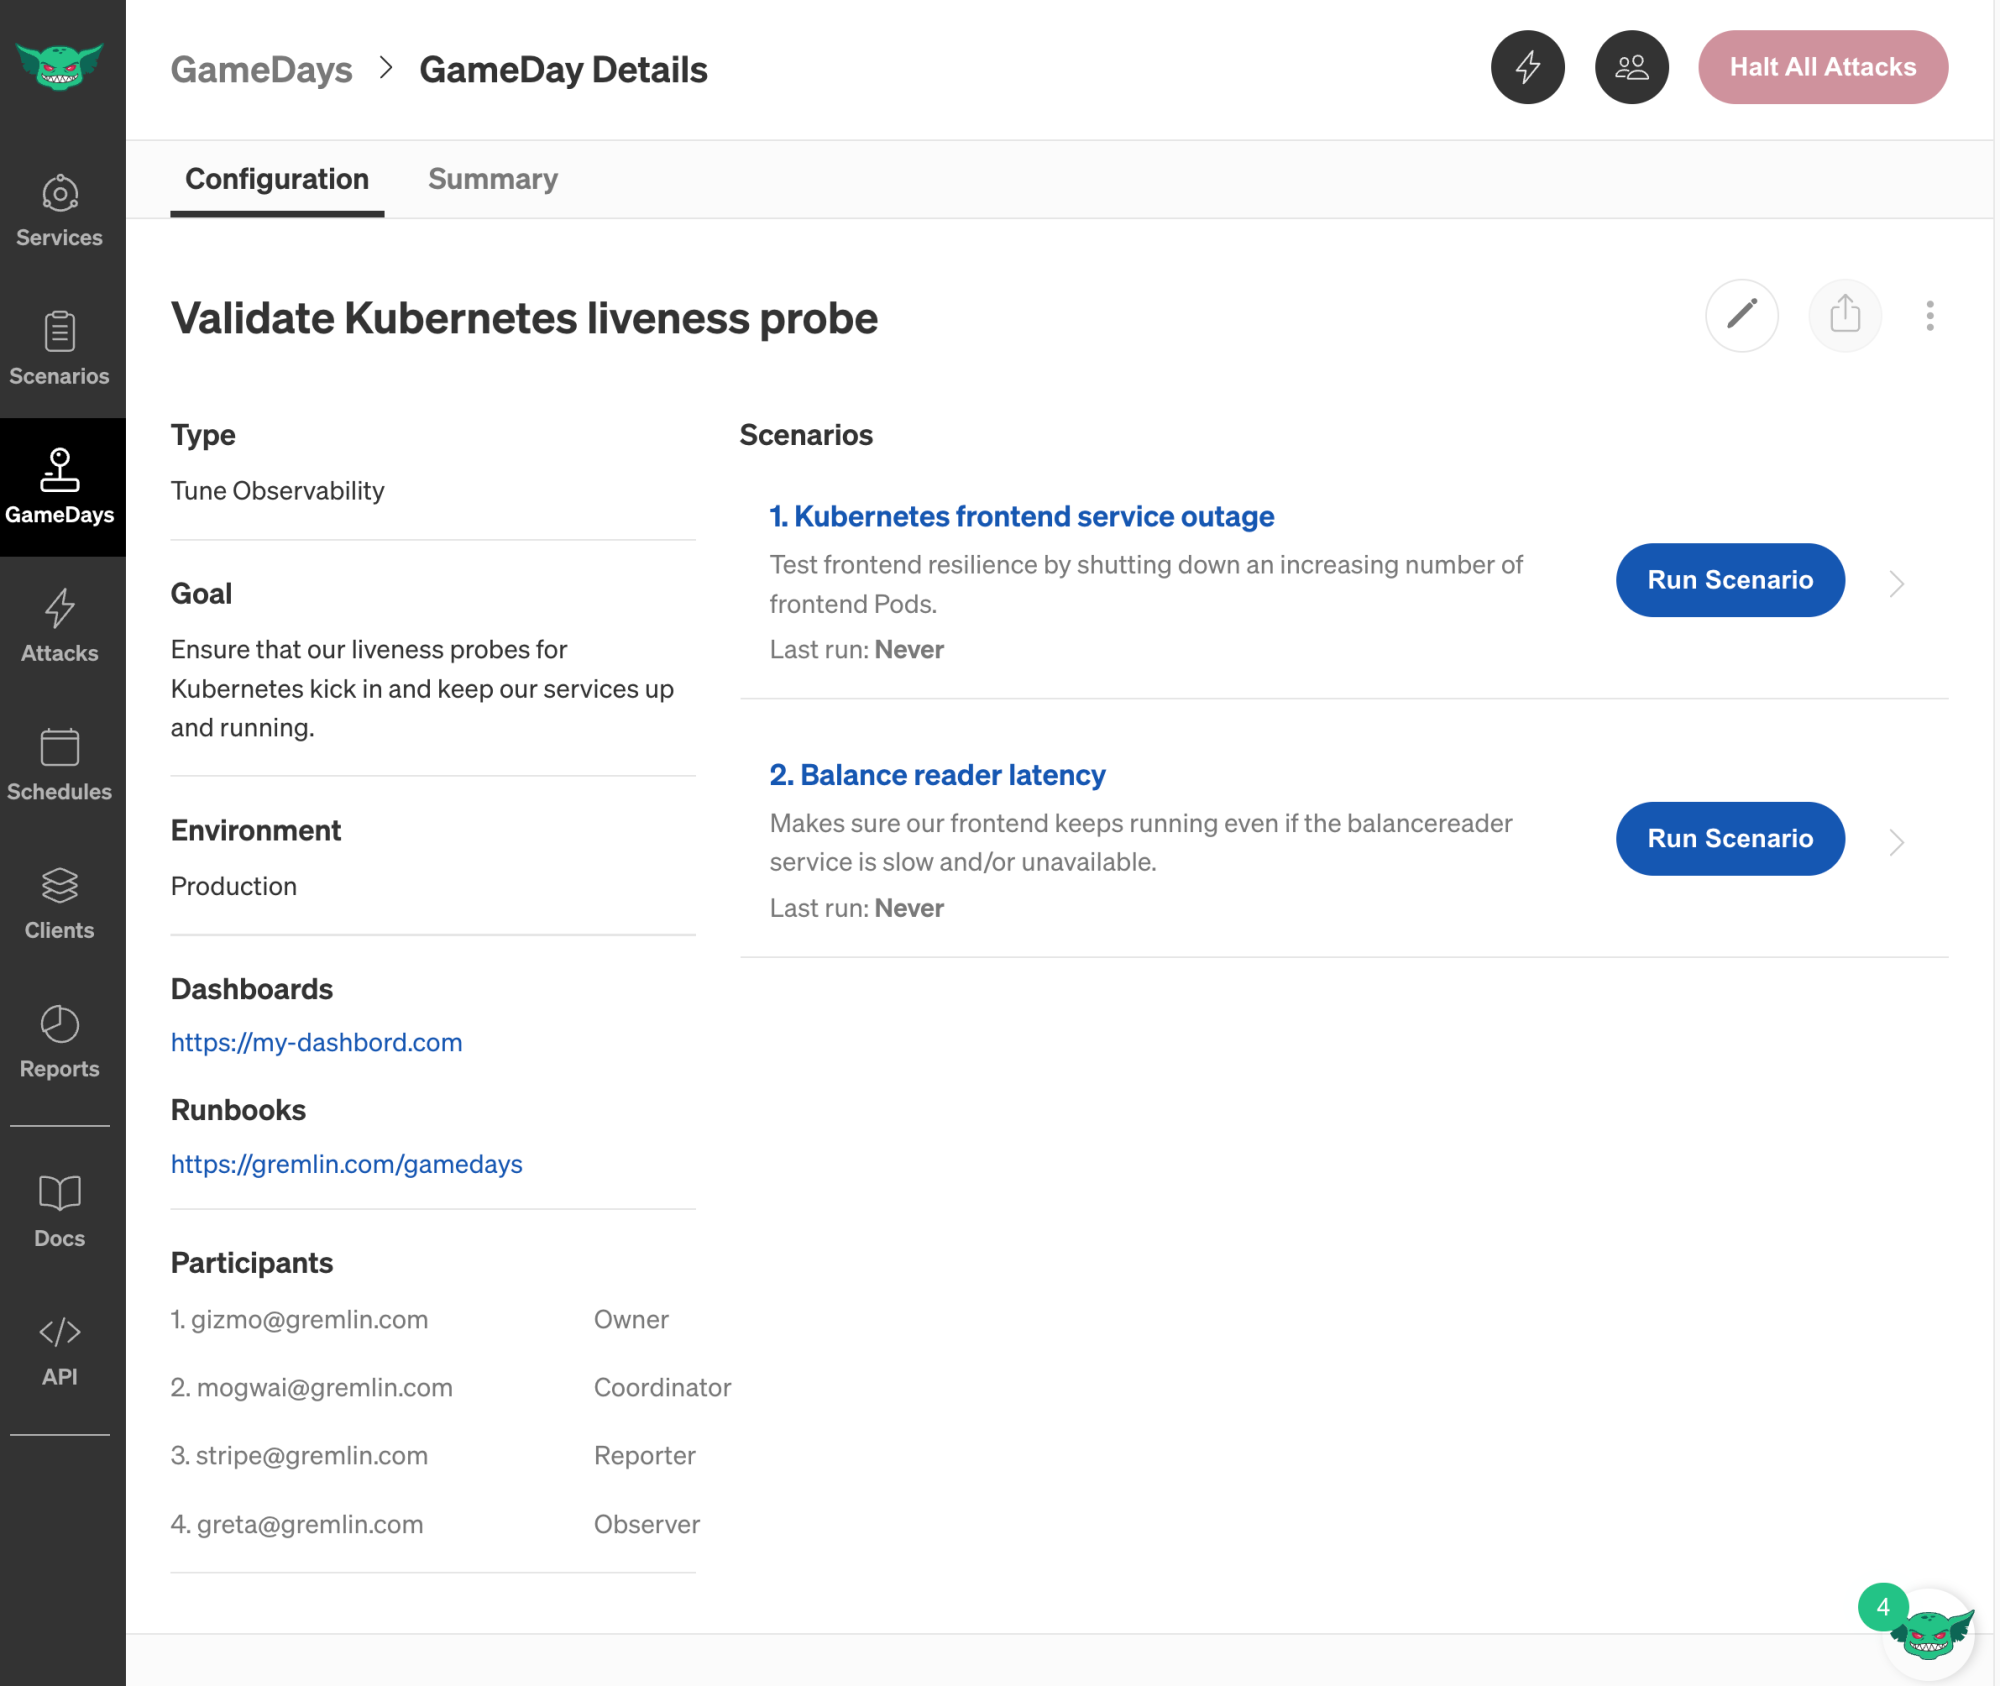
Saving your GameDay brings you to the GameDay Details page, where you can view details about your newly created GameDay. Dashboards and Runbooks also appear as clickable links.
Step 3 - Run the GameDay
Now, let's run our new GameDay. Before starting the first Scenario, make sure to assemble all participants in one location, whether that's a conference room in your office or a virtual room on a videoconferencing platform. Team members—especially the Owner and Coordinator—need to be able to quickly communicate with each other in real time. This is why it's important to schedule a specific time frame for the GameDay to take place.
Ideally this time period is free of distractions so team members can focus exclusively on running the GameDay. Distractions can not only prevent Reporters and Observers from making clear observations and conclusions, but they can also prevent Owners and Coordinators from effectively deciding when to execute or halt a Scenario as needed. This can be especially problematic when running GameDays in production, since teams need to be able to immediately halt and roll back Scenarios in case of unexpected problems or outages.
Once you've assembled your team, have the Coordinator open the GameDay from the GameDays list. Recall that the Coordinator is the person who actually initiates the GameDay in Gremlin. The Reporter should also have the Gremlin web app open, since they are responsible for recording notes, key observations, and results.
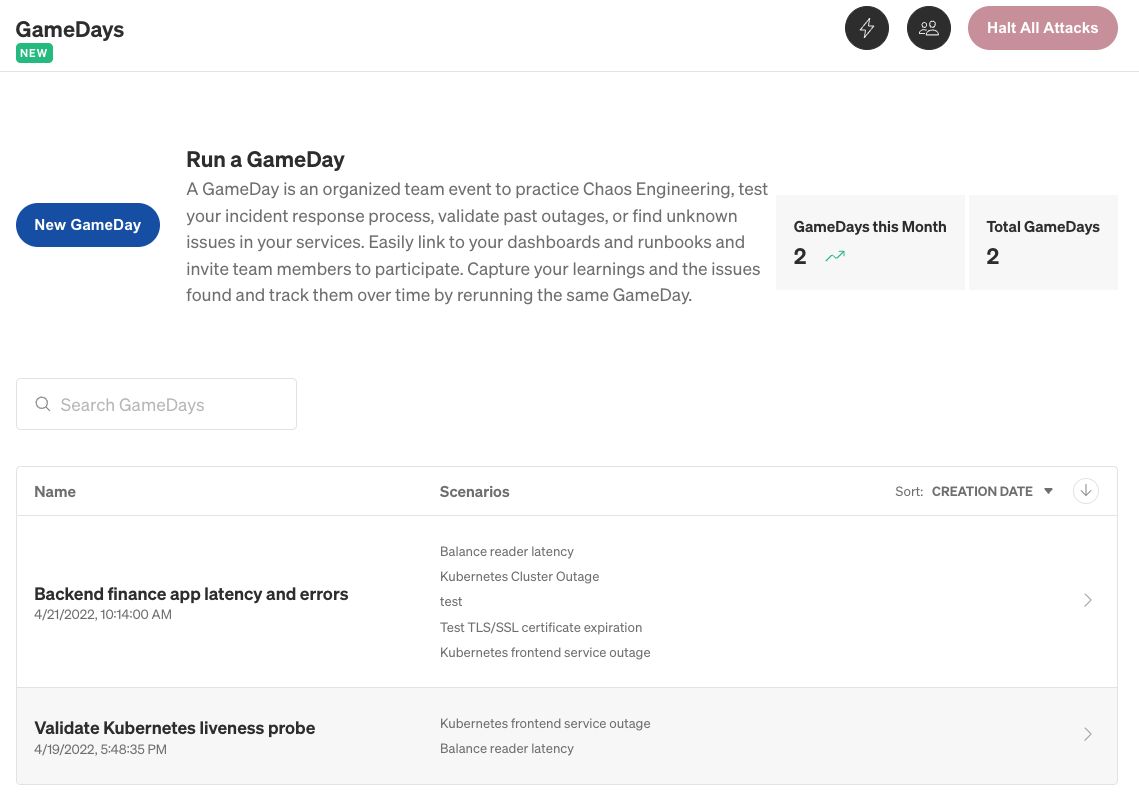
When everyone's ready, start running the first Scenario by clicking Run Scenario. This will immediately begin executing the Scenario and display the Scenario Runs screen.
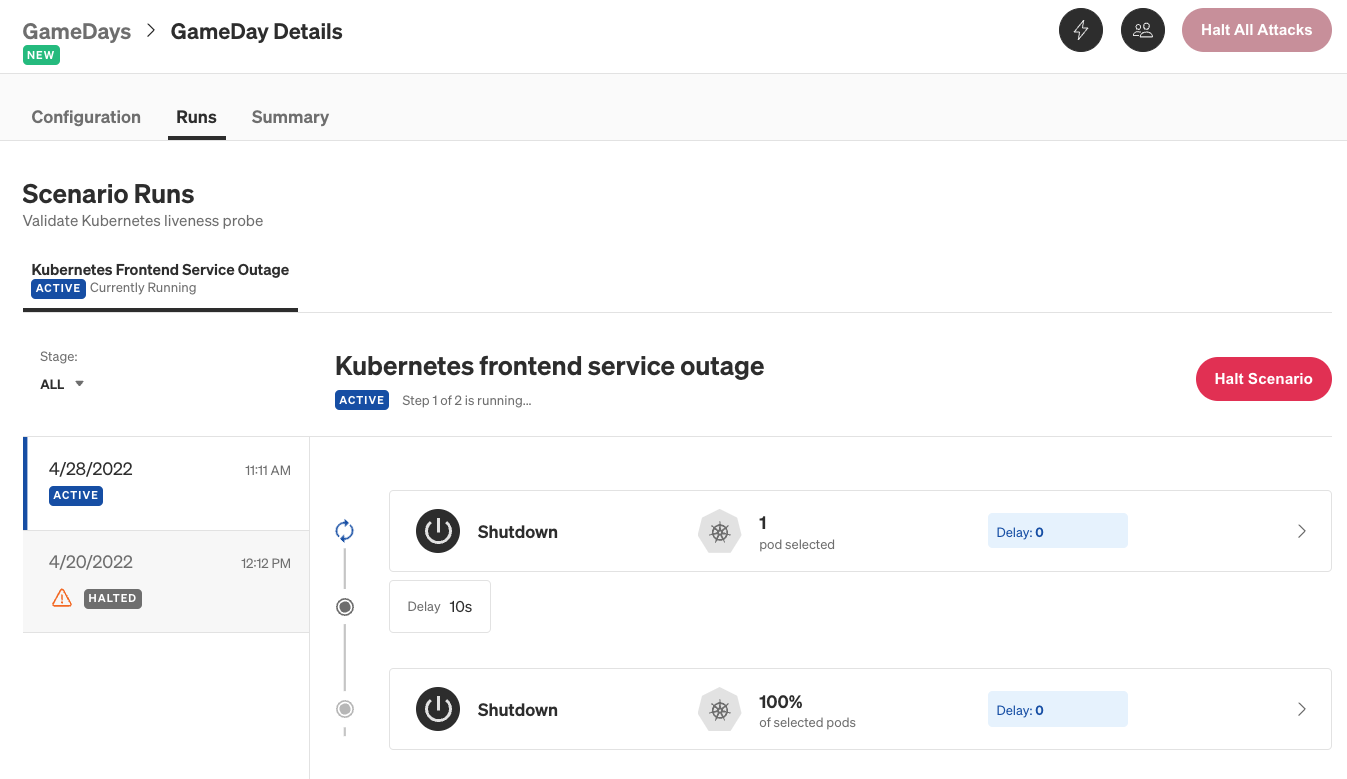
If you're the Observer, start closely watching your observability tool to determine the impact of the Scenario on your systems. Communicate any interesting or unusual observations to the team, especially any sudden or unexpected behaviors. If you notice any changes that could indicate a potential outage, such as a surge in errors or dropped traffic, let the Owner know right away so that they can decide whether to halt the GameDay.
Once the Scenario is complete, discuss the results as a team. The Observer should share any interesting metrics or graphs, and the Coordinator should mention any important events that occurred during the Scenario run (for example, a failed Health Check). At the very least, the team should be able to answer these questions:
- Did your system(s) perform as expected?
- Did the team uncover a potential incident?
- If you were recreating a past incident or testing an incident mitigation process (like automatic failover), did the mitigation(s) work as expected?
When the team is done discussing these, the Reporter then fills out the Scenario Completed screen:

Enter any additional notes, thoughts, or observations in the text box, then click Save. Additionally, you can attach any important screenshots to the Scenario Run by clicking Add Image in the Attachments section. This is useful for linking screenshots of dashboards, monitoring tools, or any other information that the team considers important or relevant to the Scenario.
Repeat this step for each additional Scenario that you want to run.
Step 4 - Record your conclusions and action items
Once you've ran your Scenario(s) and recorded your observations, it's time to wrap up the GameDay. On the GameDay Details screen, click the Summary tab to view the summary of the GameDay. This screen includes each Scenario's last run time and status, as well as additional fields for you to add additional information.
The Notes field is useful for recording any additional thoughts, observations, or conclusions about the GameDay as a whole. Was it successful? Did it prove what you were hoping to prove, or did it fall short of your expectations? How smoothly did your team run the GameDay, and is there anything you would change for the next GameDay?
The Actions field is for recording any action items resulting from this GameDay. For instance, if you found a problem with your systems or applications, you can create an action item in your ticketing system and enter the link to the ticket in this text box. This way, there's a direct link between this GameDay and improvements made to your systems. Also, it helps team members confirm and remember the key takeaways from the GameDay by letting them refer back to it at any time.
Lastly, you can add Attachments such as screenshots, documents, and other files. You can take a snapshot of your monitoring tool to back up your notes, attach log files or error messages, or even upload a recording of your GameDay session.
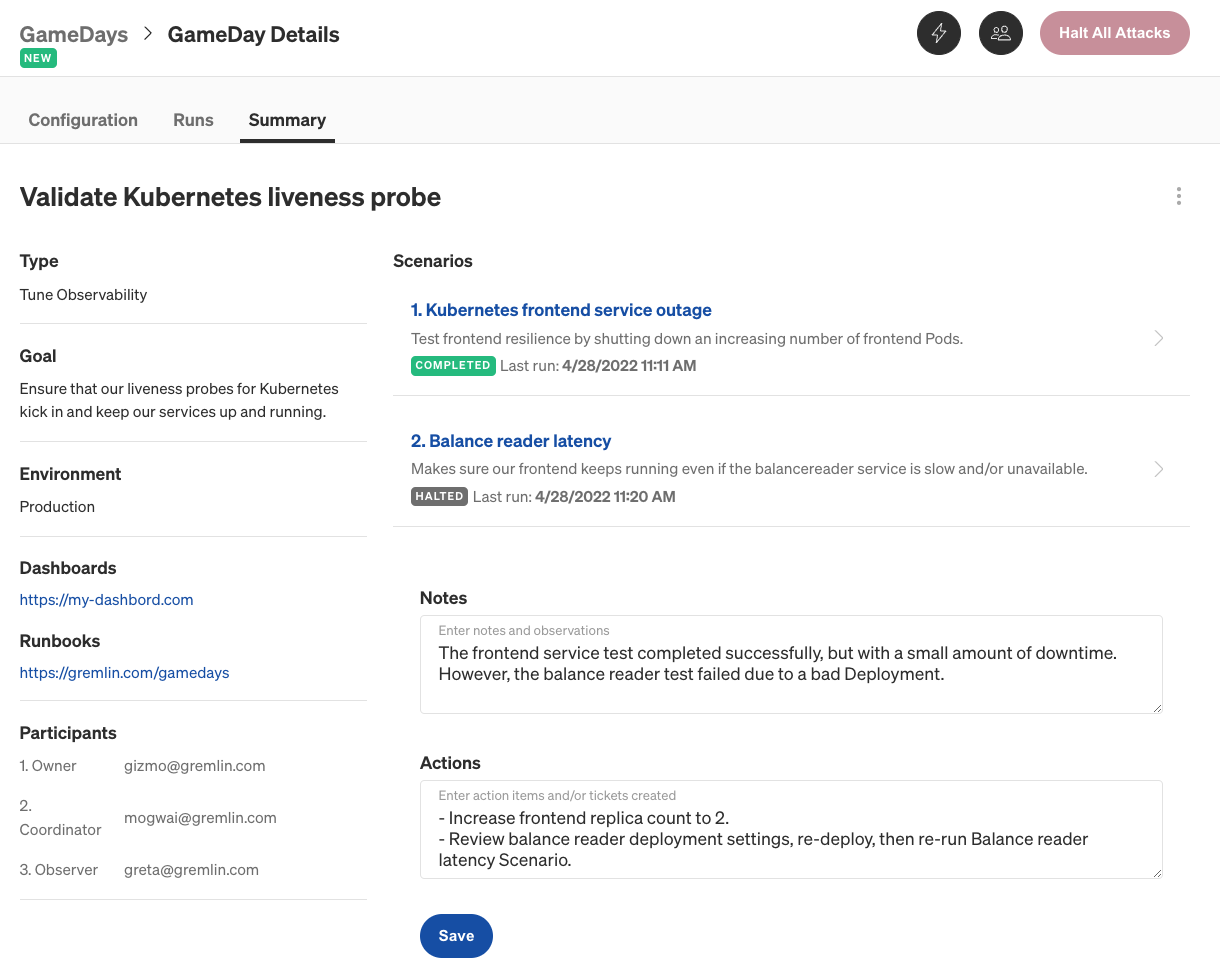
Click Save to save your updates.
Conclusion
Congratulations on running your first GameDay in Gremlin! Now that you know how to create and run a GameDay, consider migrating any other GameDays your team runs regularly into Gremlin. This way, you can keep track of when the GameDay was last run, link to dashboards and runbooks, record results, and track work items all in a single location. Remember to add or invite any key stakeholders who aren't already members of your Gremlin team, especially anyone in the role of a Commander or Reporter.
If you want to learn more about GameDays, visit the GameDay page or check out the Gremlin documentation.
Avoid downtime. Use Gremlin to turn failure into resilience.
Gremlin empowers you to proactively root out failure before it causes downtime. See how you can harness chaos to build resilient systems by requesting a demo of Gremlin.
.svg)
.png)
.svg)
.svg)
